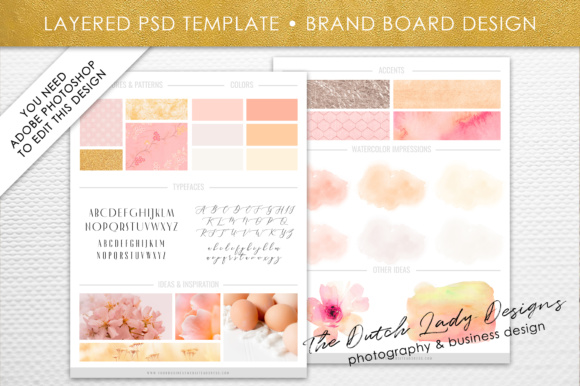
Photoshop Brand Board Template
A Photoshop Brand Board Template is a purpose-built, layered .PSD file designed to help visual professionals and brand-conscious creators quickly assemble, refine, and present core brand identity elements in one cohesive, print-ready layout. It’s not a generic design asset—it’s a working tool that bridges strategy and execution. Used early in branding projects or iterated upon during client feedback cycles, it supports consistency across touchpoints while reducing redundant setup time in Photoshop.
Where It Fits in Your Workflow
This template integrates most naturally at the planning and presentation stages—but its real value emerges when used flexibly across phases. Before launching a logo redesign, you might populate the color boxes and watercolor stains to test palette harmony against real textures. During a website overhaul, drop your new UI screenshots into the photo masks to preview how typography and spacing hold up alongside brand accents. After finalizing a social media campaign, export the completed board as a PDF for stakeholder sign-off or embed it directly into a Notion or Figma handoff document.
Unlike static PDF brand guidelines, this Photoshop Brand Board Template stays editable—no need to recreate swatches or reposition logos each time a client requests a minor adjustment. Because it’s built in Photoshop, it works where many designers already spend their time: inside the same environment they use for mockups, asset prep, and production exports.
What’s Inside the Download
You receive two high-resolution, 300 dpi, layered Photoshop (.PSD) files—each sized to US standard letter dimensions (8.5 × 11 inches). Both files are fully layered, non-destructive, and organized with clear group names so you can toggle visibility, adjust blending modes, or isolate elements without breaking structure.
- Customizable text area at the bottom: Add your web address—or any tagline, contact detail, or copyright notice—with full control over font, size, color, and position. No rasterization required.
- Included font file: The typeface used in the template is bundled with your download, eliminating licensing guesswork or substitution errors. Install it once, and the text layers render exactly as intended.
- Adjustable color boxes: Each branded hue appears in its own labeled shape layer. Double-click the fill to update globally—no need to hunt through layer effects or masks.
- Watercolor stain overlays: These aren’t flattened graphics—they’re smart object layers with opacity and blend mode presets. Tweak intensity, rotate, or mask portions to match your brand’s tone (e.g., subtle for corporate, bold for artisanal).
- Photo masks for custom imagery: Place your product shots, texture scans, pattern swatches, or mood board photos directly into designated frames. The masks preserve aspect ratio and allow non-destructive scaling or repositioning.
How It Connects With Other Tools and Assets
This template doesn’t exist in isolation—it’s meant to sync with your existing toolkit. For example, if you manage brand assets in Adobe Creative Cloud Libraries, drag the logo, icon, or pattern layers from the PSD into your library for one-click reuse across Illustrator or XD files. If you’re documenting decisions in Notion or Confluence, export a flattened JPEG of your finalized board and pair it with notes about rationale, usage rules, or version history.
When collaborating with developers, share the exported PDF version alongside CSS variables or HEX/RGB values pulled directly from the color boxes—ensuring code-level implementation matches your visual intent. For educators building curriculum materials, duplicate the template, rename layers to “Student Example” or “Grading Rubric,” and use it as a live demonstration file during class.
It also complements common brand development workflows: Use it after completing a discovery questionnaire but before presenting mood boards; slot it into your onboarding kit for new freelancers or contractors; or maintain a master version in Dropbox or Google Drive with versioned filenames (e.g., “BrandBoard_v2_20240615.psd”) for auditability.
Practical Implementation Tips
Start by opening one of the .PSD files and renaming layers to reflect your project—“Logo_Final,” “Primary_Typeface,” or “Social_Mockup.” This small step pays off when revisiting the file weeks later or handing it off to another designer. Keep the Layers panel visible and collapse groups you’re not actively editing to reduce visual noise.
When adding your own images via the photo masks, avoid stretching. Instead, right-click the smart object layer > “Edit Contents,” then scale and center your image within that isolated document. Save and close—the change updates instantly in the main board. This preserves resolution and avoids pixelation at print size.
If you’re using the watercolor stains to suggest organic texture, try lowering the opacity to 30–50% and setting the blend mode to “Multiply” or “Overlay.” That lets underlying colors show through while still reinforcing depth and tactility—ideal for wellness, education, or craft-based brands.
For long-term usability, save a “Template_Master.psd” with all default styling intact—and work only in duplicated versions. That way, you always have a clean starting point, even after multiple rounds of edits.
Compatibility and Setup Considerations
The files are compatible with Photoshop CC 2019 and newer. They’ll open in earlier versions, but some smart object behaviors or newer layer effects may render differently. To ensure fidelity, verify that your system has the included font installed before editing text layers—Photoshop will warn you if it’s missing, but installing first prevents unintended fallbacks.
No plugins or add-ons are required. Everything runs natively: layer masks, adjustment layers, clipping masks, and smart objects are all standard Photoshop features. If you use Photoshop on iPad, note that some advanced layer functions (like certain blending options or nested layer groups) may be limited—but basic text, color, and image placement remain fully functional.
Consistency, Quality Control, and Reuse
Because every element lives on its own layer with predictable naming, quality checks become faster. Need to confirm all brand colors match approved HEX values? Select each color box, open the Color Picker, and compare. Want to verify logo clear space? Turn off all layers except the logo and its margin guide (if included), then zoom to 100%.
Over time, you’ll likely develop personal conventions—like always saving exported JPEGs at 72 dpi for web previews and PDFs at 300 dpi for print. Or keeping a separate “Archive” folder with dated versions of each client’s board. These habits compound: the more consistently you apply them, the less time you’ll spend troubleshooting inconsistencies across projects.
And because the template is resolution-agnostic in structure (not pixel-dependent), it scales well beyond its 8.5 × 11 base. Enlarge the canvas for a presentation slide, or crop sections for Instagram carousels—just remember to resample carefully and check sharpness at final output size.
Who Benefits Most—and How
Freelancers use this to package deliverables faster—attaching a polished, branded board to proposals or invoices builds credibility before the first line of code or copy is written. Small business owners without in-house design teams rely on it to maintain visual alignment across Canva social posts, Mailchimp newsletters, and printed brochures—even when outsourcing piecemeal.
Educators integrate it into design thinking exercises: students populate the template using research findings, then critique how color choices support messaging goals. Bloggers preparing sponsored content use the photo masks to preview how their brand visuals interact with partner assets—catching clashes before publishing.
None of these uses require mastery of Photoshop. You don’t need to write actions or script layers—you just need to know how to double-click a color box, paste an image into a mask, or adjust text settings. That low barrier to entry is intentional. The goal isn’t to turn everyone into expert retouchers—it’s to make brand clarity accessible, repeatable, and rooted in real workflow logic.